Geometry Ace – Support
All of the information on this page is a copy of help/support documents that are easily accessable within the app.
Introduction Slide Tutorial
Found in Geometry Ace app under the Assist Menu and also shown at start up of app.


Help Document
Found in Geometry Ace app in Help Menu
Preface
Advantages and limitations of combining detailed solutions with a graphics based calculator.
The biggest advantage of this fusion is the unlimited example problems with solutions. Students can change the graphics and see the results immediately allowing for rapid absorption of information. Another big advantage is the presentation of some solutions and answers in fraction form (rather than decimals) when “grid snap” is turned on, thus providing the greatest accuracy. The limitations come about from the step-by-step presentation of the solutions, especially when grid snap is turned off. For readability purposes, the How-To’s must sometimes show rounded values for coordinates, angles, or lengths that are used to find the problem solution. Additionally, intermediate results (which must also be rounded for readability) are shown in various problem steps to improve understanding of the solution. When students enter these rounded values into a calculator, they will sometimes get a different value for the least significant digit of the final answer. All final answers displayed in the How-To’s are the more accurate results of the calculator internal to the program. This format decision was made to retain coherence between the screen display, the values in the properties menu, and the results of the How-To’s. Students can reduce the amount of error in their calculations by storing all intermediate results in their calculator for use the in the final steps.
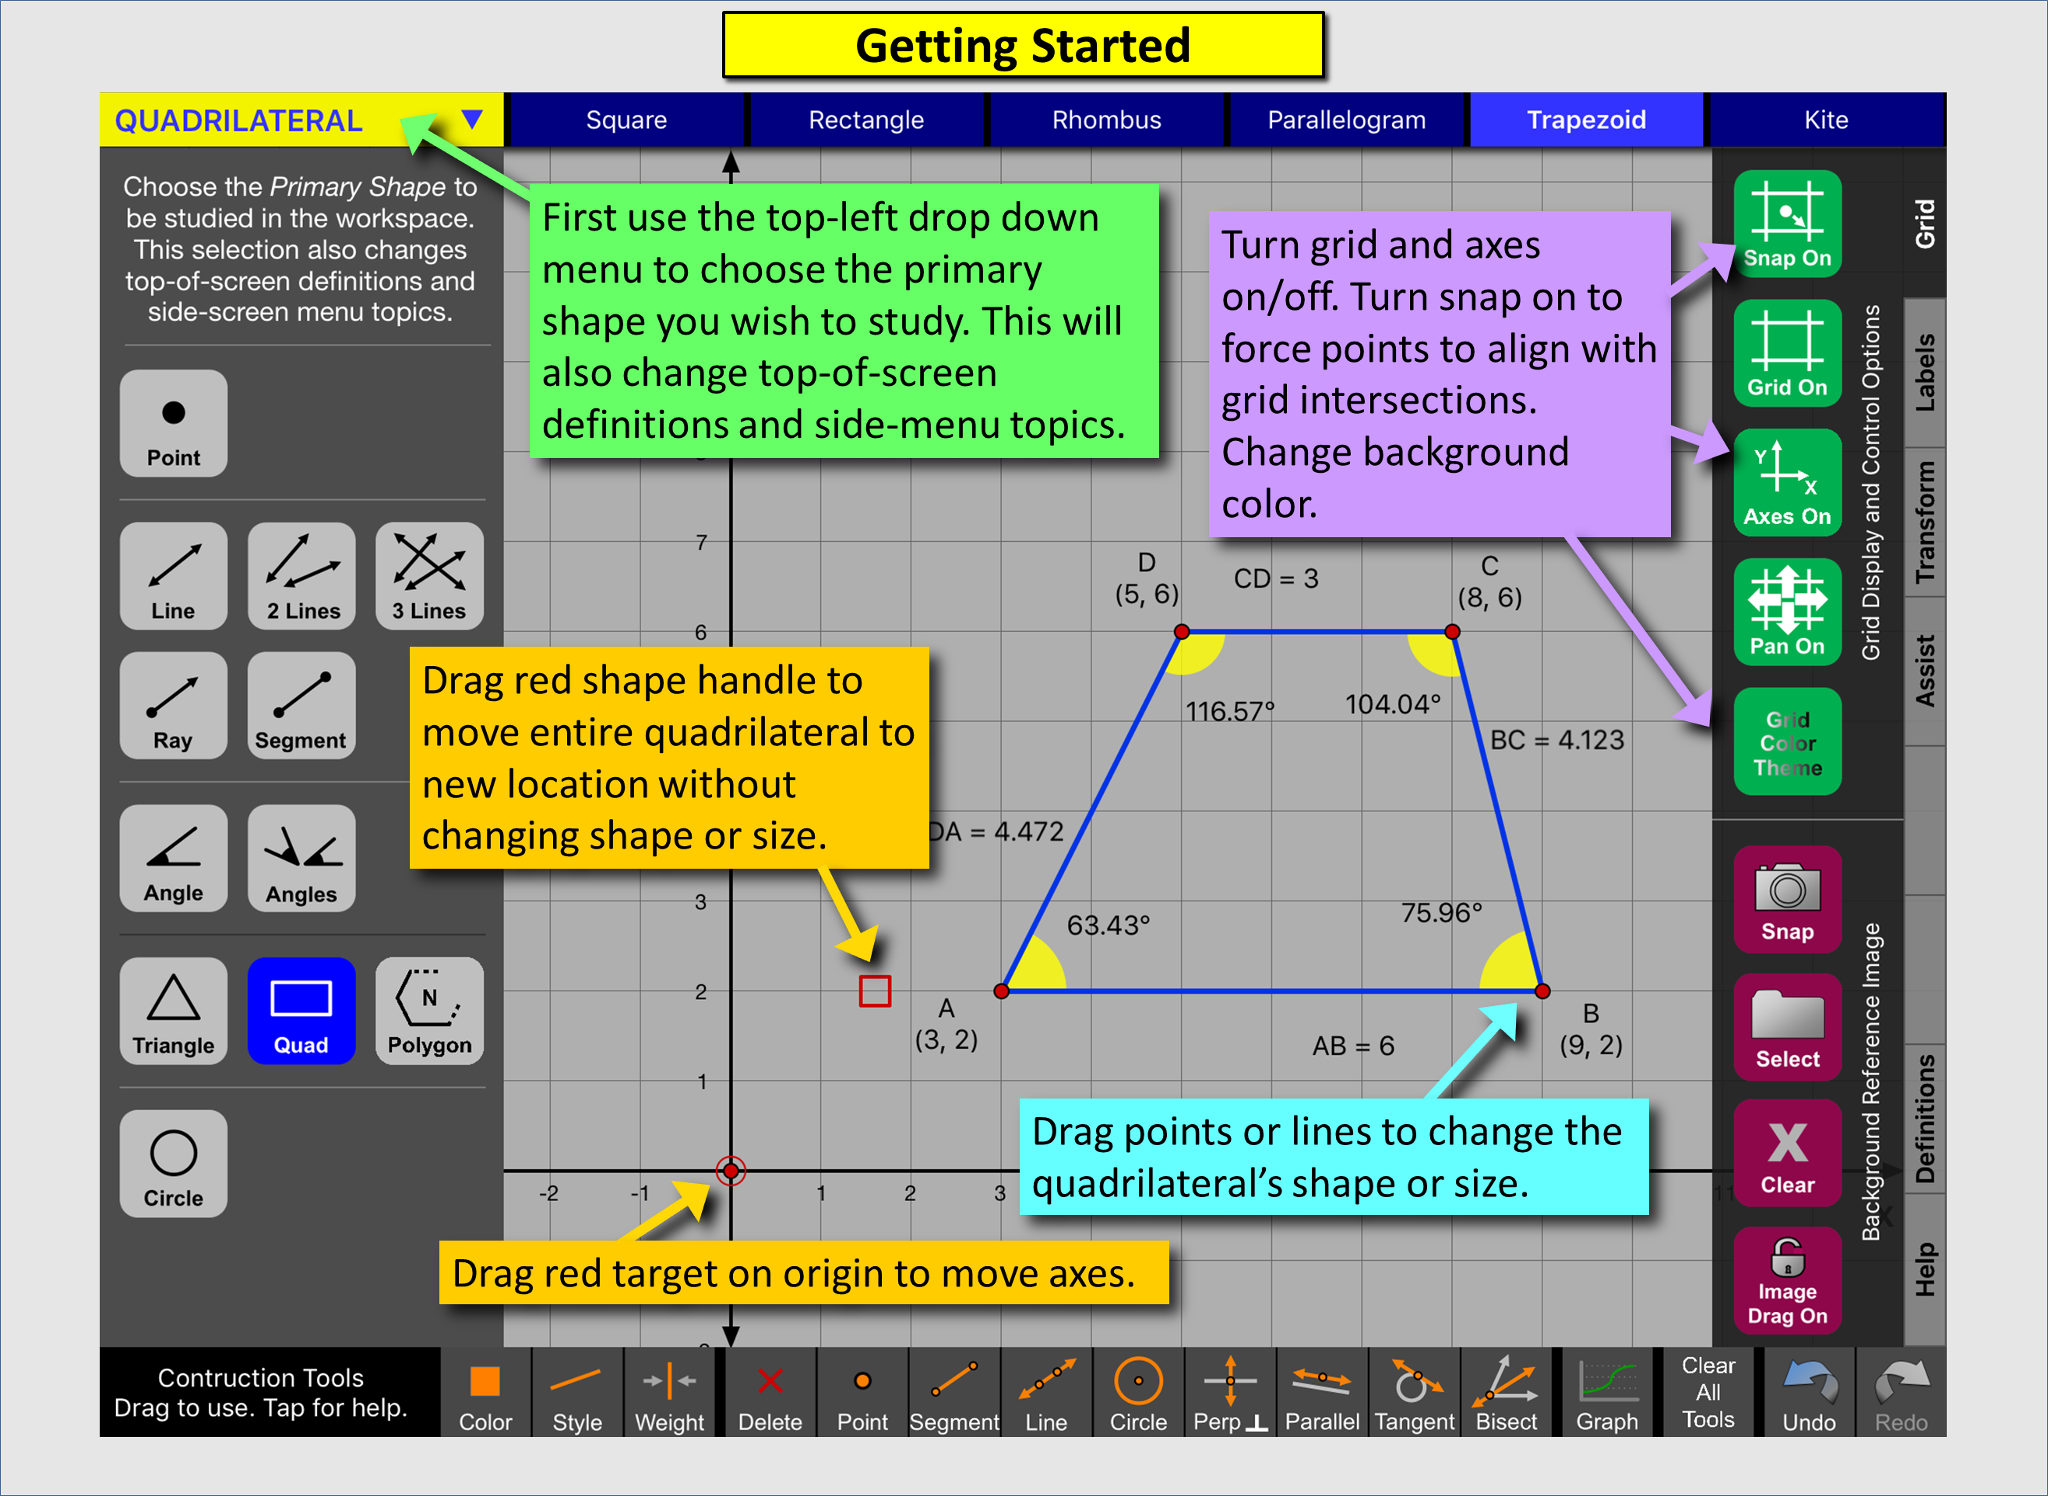
Getting Started
First use the top-left drop-down menu to choose the Primary Shape you wish to study. This will also change top-of-screen definitions and left-hand side-menu topics. The chosen Primary Shape appears in the center workspace and you can change it by dragging points, lines, etc. Note: Construction Tools from the bottom of the screen can be used on the workspace for any Primary Shape.
Topics for each Primary Shape:
(More topics will be added in future releases)
Topics: Point
Coordinates of a point
Quadrants in the coordinate plane
Distance between points
Translation, Reflection, Rotation
Topics: Line
Slope
Vertical, Horizontal
Y-intercept
Equation of a line
Equation of a parallel line
Equation of a perpendicular line
Distance between point and line
Distance between two parallel lines
Translation, Reflection, Rotation
Construction of a perpendicular line
Construction of a parallel line
Topics: Two lines
Parallel, Intersecting, Perpendicular
Slope of parallel lines
Slope of perpendicular lines
Coordinates-intersection of 2 lines
Angles between two lines
Topics: Three lines
Transversals
Alternate interior angles
Alternate exterior angles
Corresponding angles
Same side interior angles
Vertical angles
Linear pair of angles
Topics: Ray
Slope
Vertical, Horizontal
Y-intercept
Equation for a ray
Translation, Reflection, Rotation
Topics: Line Segment
Slope
Vertical, Horizontal
Y-intercept
Equation for a line segment
Midpoint of segment
Length of segment
Equation for perpendicular bisector
Construction of perpendicular bisector
Translation, Reflection, Rotation
Topics: Angle
Vertex, Legs, Interior, Measure
Acute, Right, Obtuse, Straight, Reflex
Convert between degrees and radians
Algebraic equation for angle bisector
Construction of angle bisector
Topics: Two Angles
Congruent, Adjacent, Complimentary, Supplementary, Linear Pair, Vertical
Topics: Triangle
Acute, Obtuse, Right, Oblique,
Equilateral, Isosceles, Scalene,
3-4-5
45-45-90
30-60-90
Perimeter
Area-BASIC ELEMENTARY
Area-coordinate plane-ALGEBRA
Area-Box Method
Centroid-ALGEBRA
Circumcenter-ALGEBRA
Incenter-ALGEBRA
Centroid-CONSTRUCTION
Circumcenter-CONSTRUCTION
Incenter-CONSTRUCTION
Translation, Reflection, Rotation
Topics: Quadrilateral
Square, Rectangle, Rhombus,
Parallelogram, Trapezoid, Kite
Perimeter
Area
Varignon parallelogram
Vertex centroid
Area centroid
Translation, Reflection, Rotation
Topics: Polygon
Triangle, Quadrilateral, Pentagon, Hexagon, Heptagon, Octagon, Nonagon, Decagon
Convex, Concave
Regular, Irregular
Sum of interior angles
Topics: Circle
Radius, Diameter, Tangent, Secant, Chord
Circumference
Area
Measure of an arc
Length of an arc
Area of a sector
The Workspace
The workspace is the middle area of the screen where you can change/move/transform the current Primary Shape and also create constructions. There is a separate workspace for each Primary Shape. The information provided in the workspace can be modified via the Grid, Labels, Properties, and Units menus. If you leave the workspace to learn about a different primary shape and then come back, the workspace will be the same as you left it. NOTE: With the exception of background color theme and background image, ALL settings are local to the current selected Primary Shape.
Workspace: Undo & Redo
The Undo and Redo buttons at the bottom right of the screen will undo and redo changes made to the current workspace including importing of files. These buttons will not cause the workspace to change back to a previous Primary Shape. Undo/Redo information is lost when you change to/from a different Primary Shape.
Workspace: Moving points, endpoints, and vertices
Move a point by touching the point and dragging it to a new location. The point drops as you lift your finger. Points snap to the grid intersections if Grid Snap is turned on via the Grid Menu. The Input Menu can be used to type in exact coordinates of points associated with the Primary Shape. (Note: Points of the Primary Shape cannot be attached to anything when you drag them. However, construction tools can be dragged and attached to the Primary Shape or other construction tools. Please see the Construction Tools section of this document for information on attachments.)
Workspace: Moving lines, rays, and segments
You can move a line, segment, or ray by touching it in a place other than one of its defining points. This way you can drag the line/ray/segment while preserving its slope and length.
Workspace: Moving entire Primary Shape
To move an entire Primary Shape triangle, quadrilateral, or polygon without altering its shape or size, look for the red shape handle. It will be a tiny red triangle, square, or pentagon. Dragging this red shape handle will drag the entire shape.
Workspace: Moving the Axes
To move just the Axes to a new location (thus changing coordinates of all existing points on grid), drag the red bullseye target on the origin.
Workspace: Panning and Zooming
To pan, touch any blank area in the workspace and slide everything left, right, up, or down. To zoom in or out, touch the screen with two fingers and spread them apart or pinch them together. You can lock/unlock the panning and zooming by turning “Pan” on/off via the Grid menu. If panning and zooming are unlocked, they are always enabled continuously while you are using the program. If they are unlocked, there is no need to select this each time you want to pan or zoom.
Workspace: Grid Menu: Snap, Grid, Axes, Panning/Zooming, Color
The Grid Menu has controls to change the workspace display and lock/unlock panning and zooming:
- Grid Snap: on/off
- Show Grid: on/off
- Show Axes: on/off
- Allow Panning and Zooming: on/off
- Change background color theme
NOTE: Background color theme (and background image) are the only display controls that are global and used for ALL Primary Shape workspaces. All other settings are for the “current Primary Shape” workspace only.
Workspace: Grid Menu: Background Image
You can place a picture behind the grid in the workspace it you want to overlay lines or shapes and examine angles or slopes in the picture. Use the Snap button to take a picture. Use the Select button to load already existing picture. The Clear button will remove the image. The Image Drag button needs to be “On” if you want to move or resize the background image once it is loaded. You need to be sure to turn the Image Drag button “Off” if you want to do normal panning or zooming of the workspace grid. Use the Grid Color Theme button to choose a black or white grid (whichever shows up better on top of your background image).
Note: Like the color scheme, the background image is global to all Primary Shape workspaces.
Workspace: Input Menu: Defining the Primary Shape using angles, lengths, slopes etc.
If you wish to define your Primary Shape by entering exact values for points, angles, lengths, or slopes, use the Input menu on the left side of the screen. (NOTE: Equilateral Triangles and 30/60/90 triangles cannot be created by dragging the vertices with grid snap turned on. These are most easily created using the Input menu. Upon creation using the Input Menu, grid snap will be ignored for certain points if necessary.)
Workspace: Primary Shape Polygons Cannot be Self-Intersecting
A polygon is considered self-intersecting if the line segments that make up the sides cross over each other and intersect at places other than the vertices of the polygon. These types of polygons are not supported by this application. If you try to modify the Primary Shape so that it is self-intersecting, it will revert back to its previous state and give a warning message.
Workspace: Primary Shape Triangles Cannot be Inverted
An inverted polygon is turned “inside out” such that all of the interior angles become external angles. This application will give a warning message that “inverted triangles” are not allowed if you try to drag a vertex of a Primary Shape triangle across the opposite side of the triangle. The programming required for How-Tos and for attribute recognition will not support this. To achieve your desired triangle, simply drag a different vertex to that position.
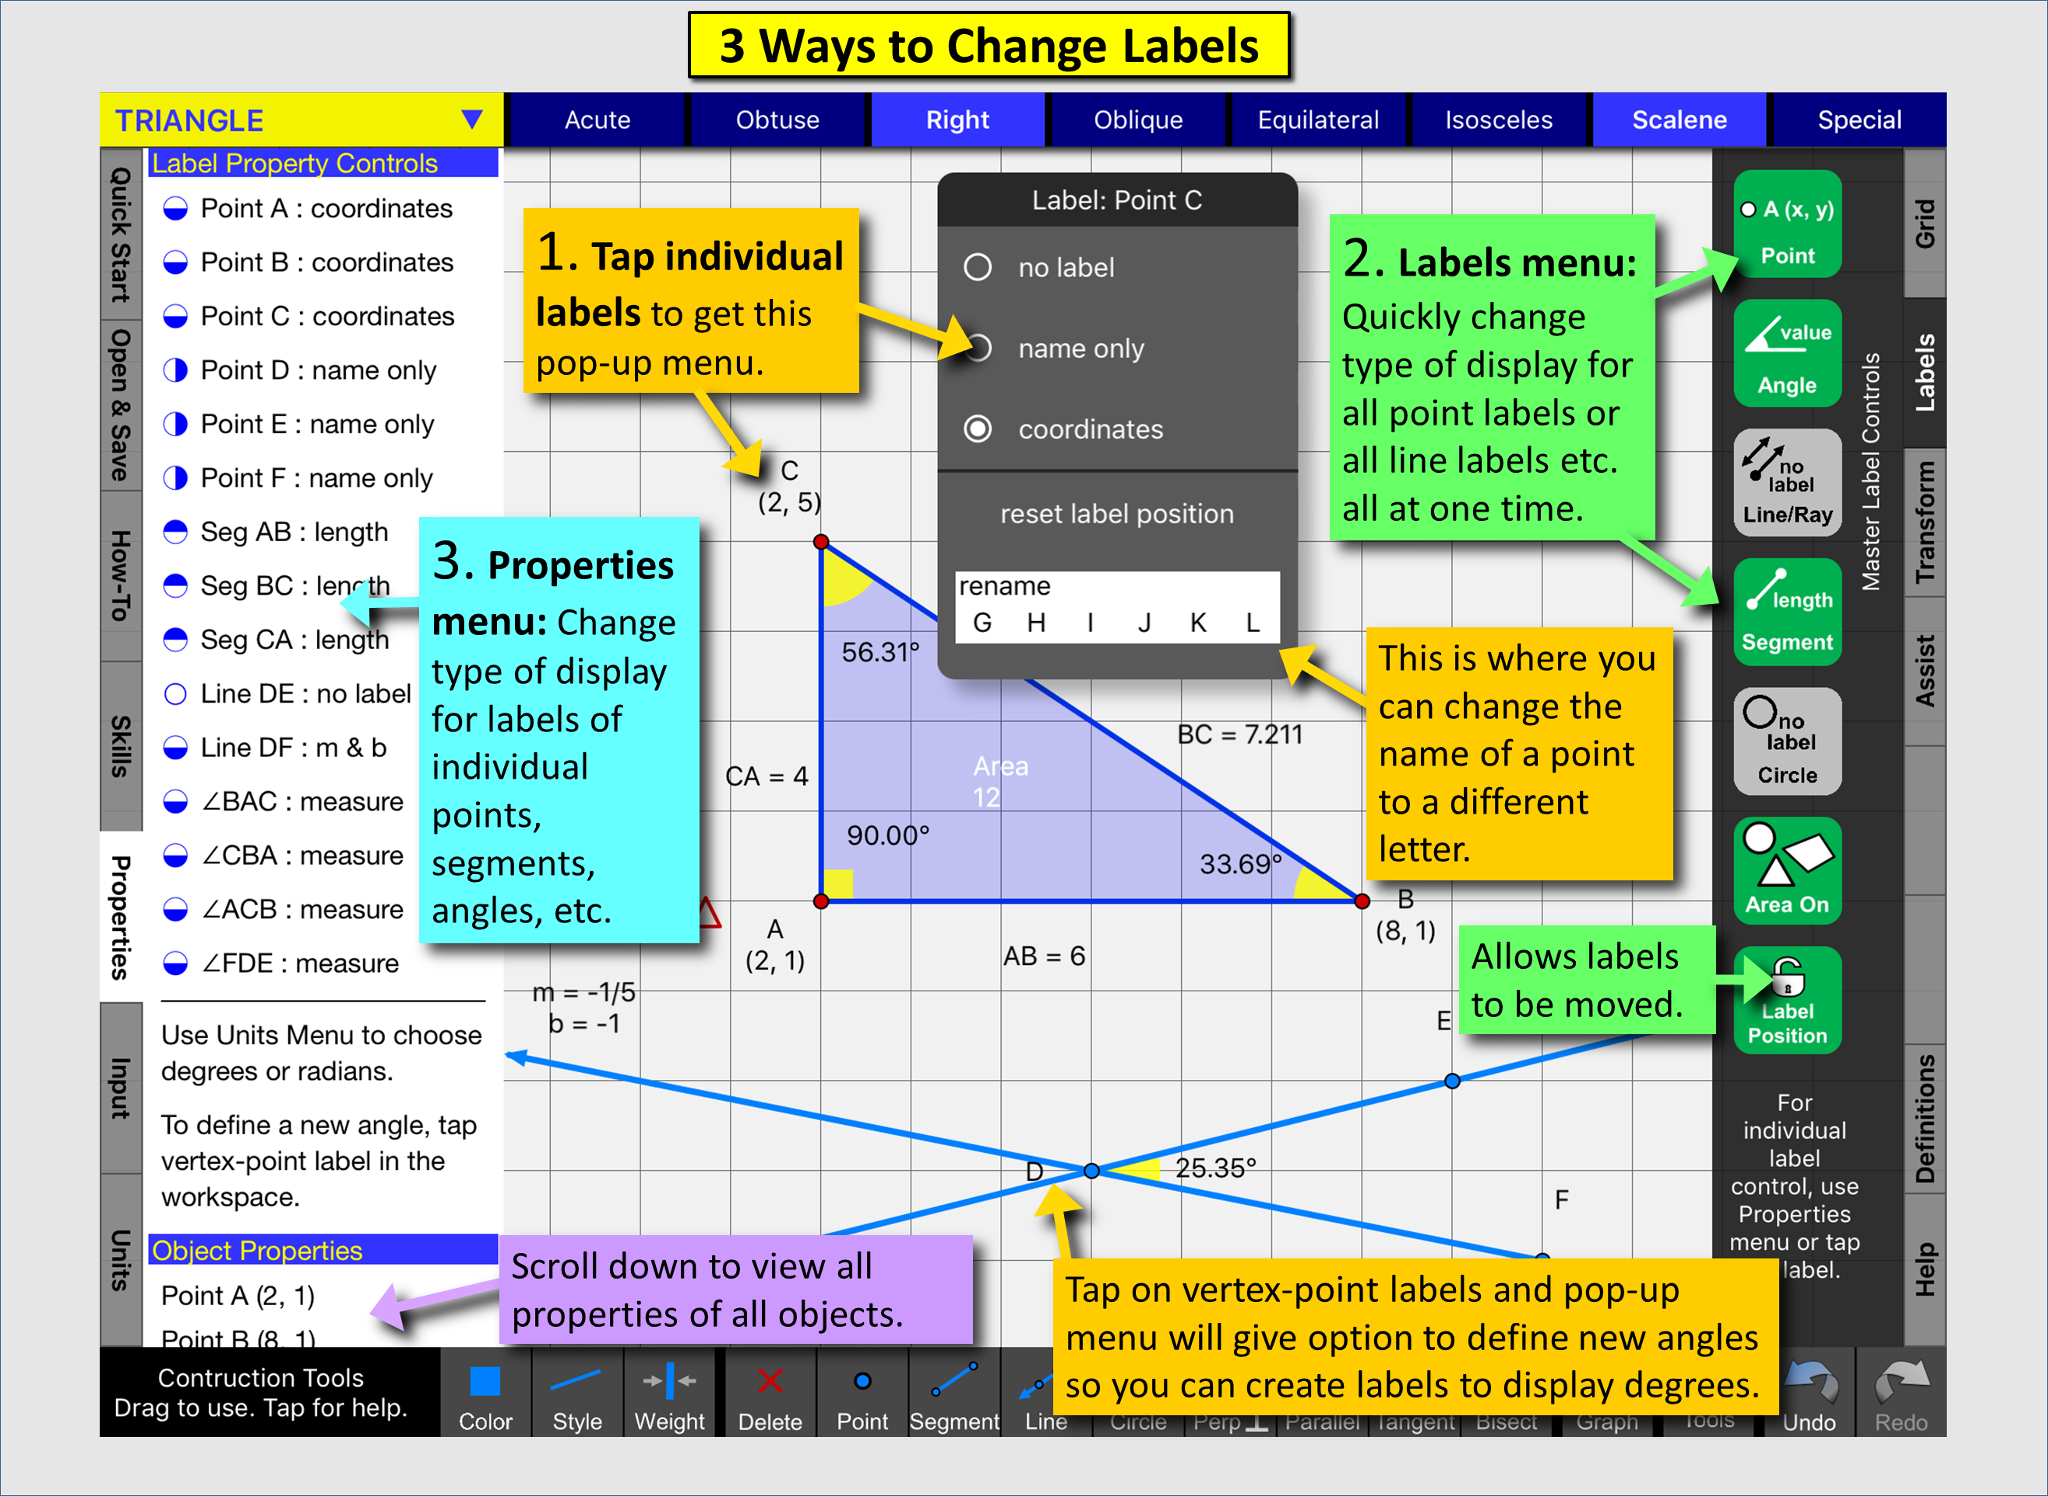
3 Ways to Change Labels in Workspace
Change Labels: Method 1:
Drag/Tap the Label
Drag the label to change its position.
Tap the label to bring up a pop-up menu which has the following options:
- No label
- Show name only
- Show coordinates/length/slope etc.
- Reset label position (to default place if you have previously dragged it).
- Rename label
No label: If you hide the label by tapping on “no label”, you will have to use the Labels Menu or the Properties Menu to bring it back.
Rename: Only points can be renamed. Lines, angles, and circles etc. all get their names from defining points. The white box at the bottom of this pop-up is the only place where you can change the point label name. Slide the selection list until you see the desired alphabet character, then tap on the desired new label. If the character you want is not in the list, you will first have to rename the point that is using it.
Angles: Change between degrees and radians in the Units Menu.
Defining New Angles: To define a new angle and display its measure, first tap on the label of the point which is the vertex of the angle. The pop-up menu will give you options to define a new angle. NOTE: Since angle names are created from point names of the vertex and legs, then there must be a point on the vertex and on each of the legs in order to define the new angle. If needed, use the construction point tool, and place points on the vertex and legs.
Change Labels: Method 2:
Properties Menu
The top half of this menu controls the display of individual labels. Tap the Label name on the list to toggle through display options. Choices include:
- No Label
- Show label name only
- Show coordinates/length/slope etc.
Note: Method 1 is the only way to rename or reset label position.
The bottom half of this menu displays all properties for all objects in the workspace all of the time.
Angles: Change between degrees and radians in the Units Menu.
Change Labels: Method 3:
Labels Menu
Group Controls: The Labels menu provides a quick way to change the display for a group of labels all at once. There is a “master control” for all: points, angles, lines, segments, and circles. This allows you to make the display the same, for example, for all points. Tap on the button to toggle through display choices.
Area Control: This control displays area for the primary shape only.
Lock Label Position: This control can be used to lock label position (location) for all labels so you cannot accidentally drag them.
Circles: This control changes displays for both Primary Shape and Construction Tool circles.
Angles: Change between degrees and radians in the Units Menu.
Units menu
Angles: Selection of degrees or radians changes the displays in the center Workspace, the Properties Menu, and the How-To problem solutions of the current “Primary Shape”.
Grid Units for Length and Area: This menu allows you to choose the unit of length that each grid line represents for the current selected “Primary Shape”. These units are used is in How-To’s that calculate length, perimeters, and area. This is to remind students that these types of problems should show units in the answer. The units are not displayed in the workspace, but are visible in the Properties Menu.
Top-of-Screen Definitions
The top of the screen is lined with possible properties or classifications of the current chosen Primary Shape. Tap on the attribute name at the top of the screen and a drop down box will give the definition and illustrations of that attribute. These top-of-screen attributes will be highlighted when the Primary Shape has been changed to meet the definition of that attribute. More than one attribute can be highlighted at a time if the Primary Shape meets more than one definition. The definitions at the top of the screen for Quadrilaterals are inclusive so as to help prepare students for high school geometry and to align with the Common Core. For example, if you create a square, it technically meets the definitions for all of the quadrilateral types so all boxes will be highlighted even though we would call it a square.
Note 1: Equilateral Triangles and 30/60/90 triangles cannot be created by dragging the vertices with grid snap turned on. These are most easily created using the Input menu. The Grid Snap setting will be ignored by one or more points if necessary when the input menu is used.
Note 2: The Circle attributes work a little differently. You need to drag construction tools from the bottom to the screen to create a chord, secant, radius etc.
Note 3: The angle attributes for Three Lines work a little differently. You need to select angles, two at a time, by tapping on the angle label. This will turn the label red. If the pair that you have selected matches a definition at the top of the screen, it will become highlighted. Alternate interior, alternate exterior, corresponding, and same side interior angle pairs will only be recognized if the two lines which the transversal crosses are parallel.
Quick Start menu
Quick Starts allow you to quickly get to a screen with desired tutorials and/or workspace configurations for common subjects. For teachers, Quick-Starts allow you to quickly get all of your students on the same page with the same settings. For teachers who want something more specific, you can create your own “quick starts” using the Export and Import functions in the Open & Save menu.
Open & Save menu
Open & Save menu: 8 Save Spots
Each Primary Shape has its own 8 save spots. Tap the gray box to save the current workspace configuration. Tap on “open” to load the saved data into the workspace. Saved data includes not only the size/location/shape of the Primary Shape, but also all workspace settings such as grid snap, axes, labels, and construction tools. The only exceptions are the Grid Color Theme and choice of degrees/radians, which are global to all Primary Shapes.
If you change to a different Primary Shape and then return, the workspace will be the same as you left it so you do not always need to save it.
Open & Save menu: Export and Import
In addition to the 8 save spots, you can export a workspace configuration and save it outside of Geometry Ace in any text document such as Notes. Exporting to the Clipboard allows you to then paste it somewhere else. Exporting to Email allows you to share a workspace configuration with another person. Import Clipboard allows you to open a workspace configuration saved outside of Geometry Ace. Simply “copy” the text from where you saved it, then select “Import”,“paste” and “load” inside of Geometry Ace. When importing a file, if you are not already on the page for the Primary Shape that the import contains, Geometry Ace will ask you if you want to switch to the corresponding Primary Shape.
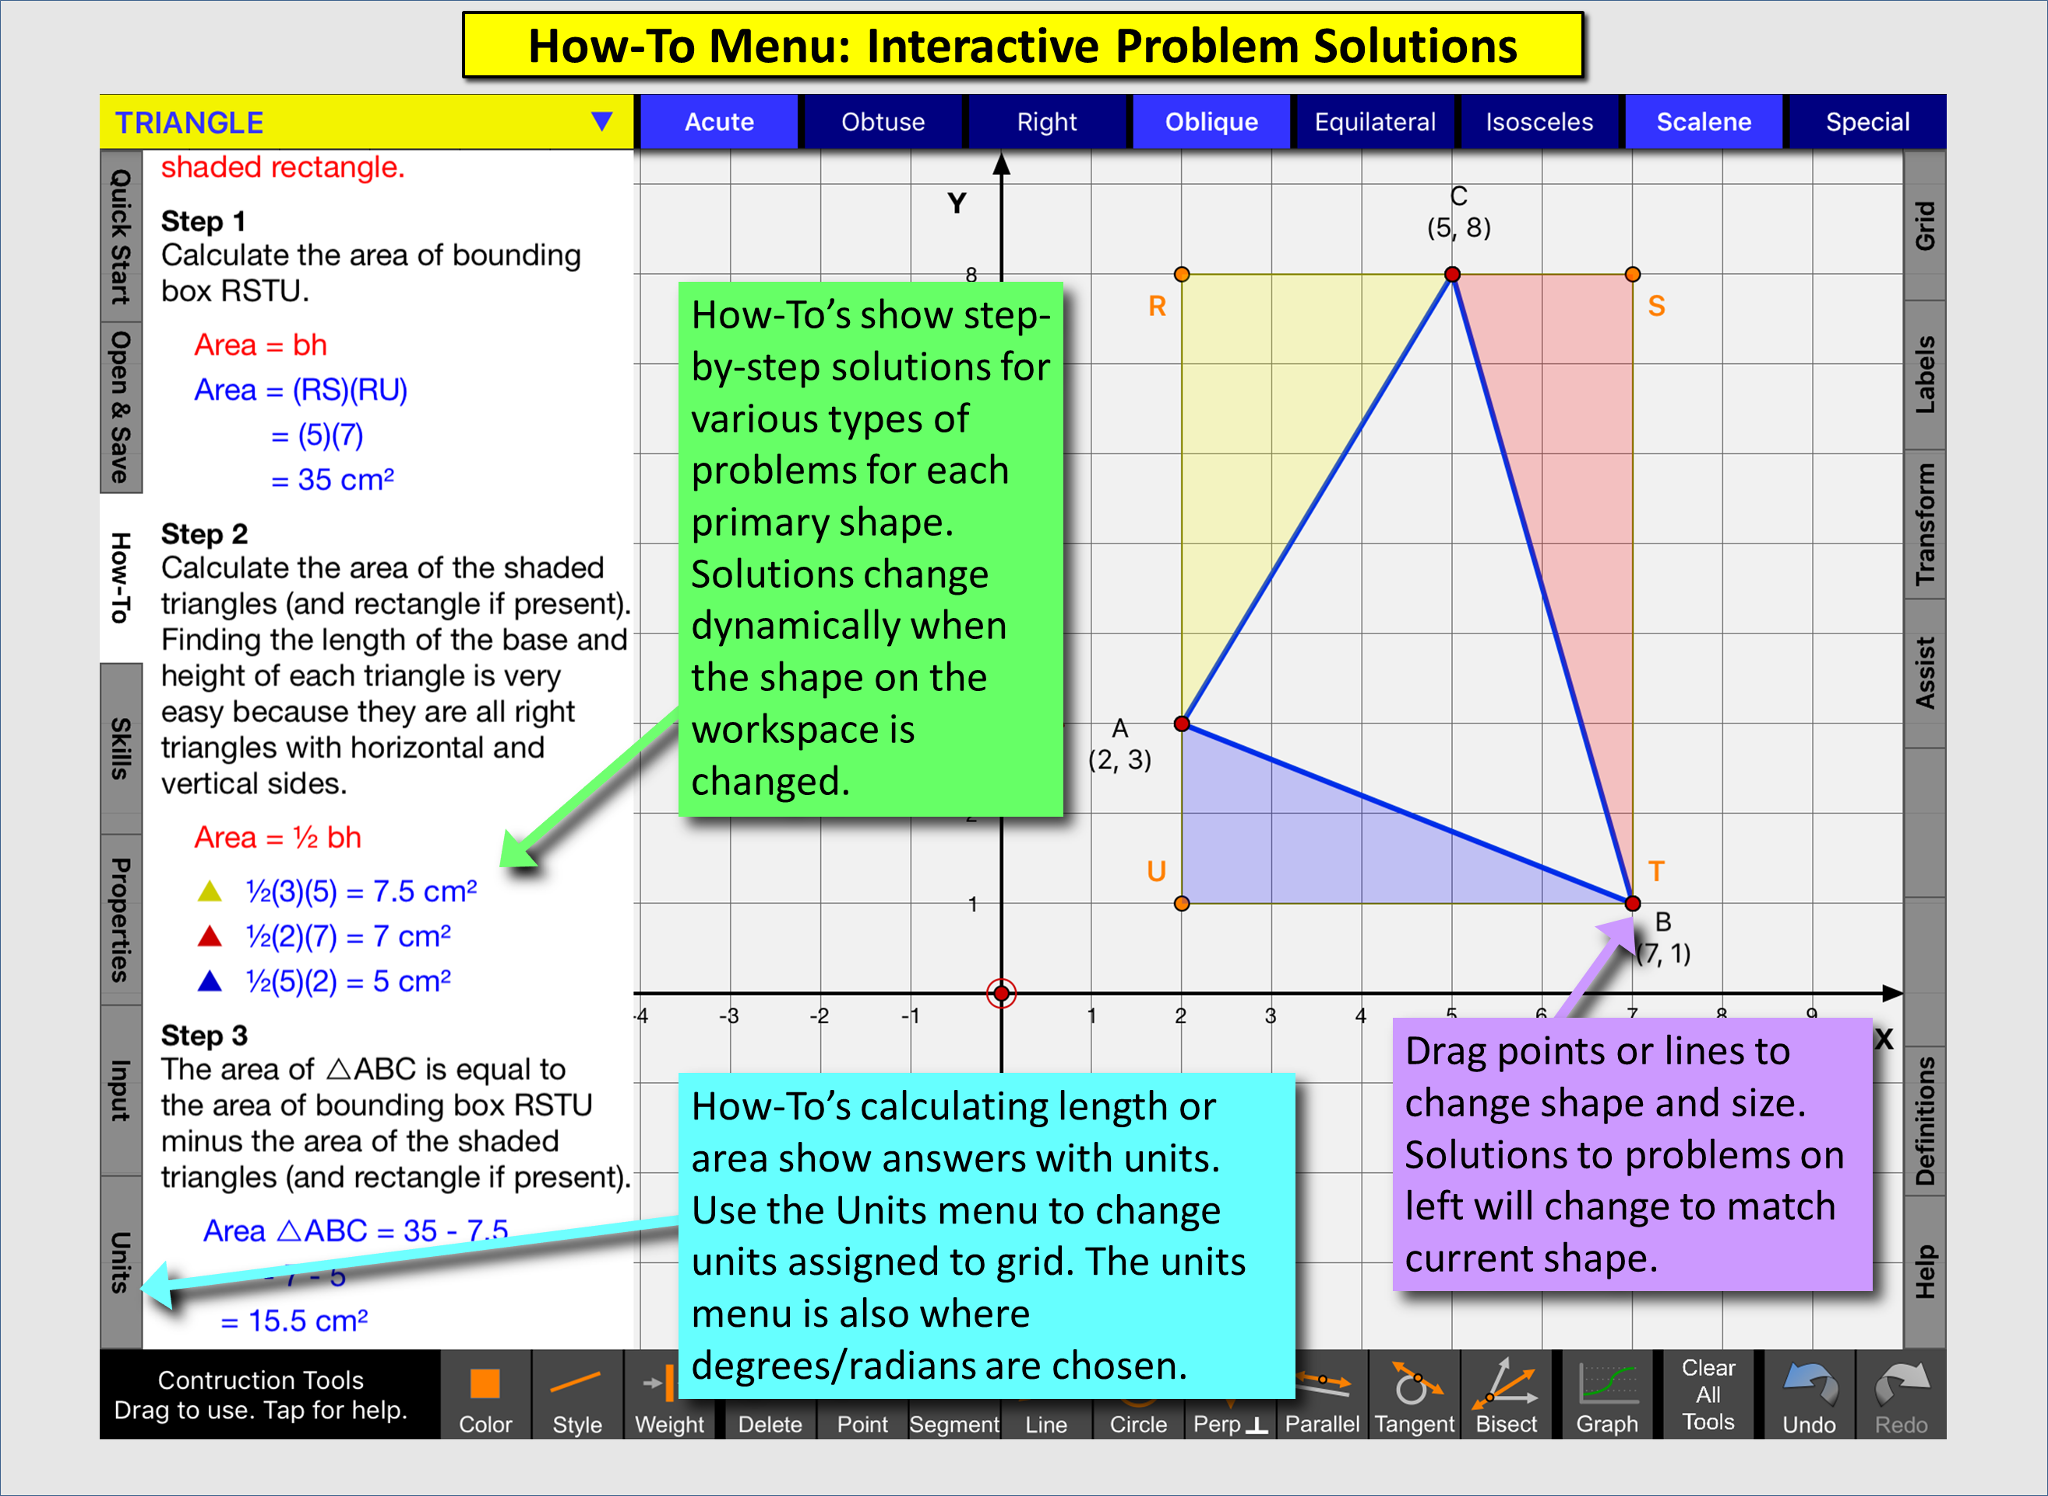
How-To menu
This menu allows you to select tutorials that show step-by-step solutions to various problems relating to the current Primary Shape in the workspace. Example tutorials include how to write the equation for a line or how to find the area of a quadrilateral. These tutorials change dynamically when you change the Primary Shape in the workspace. This essentially creates an infinite number of solved problems and you can investigate unlimited “what if’s” like “What would the solution be if my line was vertical?”. When a How-To is opened, point and line labels are sometimes changed to show information that is needed or hide information that clutters the screen. Labels can be changed by the user while the How-To is open. As described in the Preface to this document, all final answers of the How-To’s are results of the calculator internal to this program. Students using rounded numbers for coordinates or lengths will sometimes get a different value for the least significant digit of the final answer.
Skills menu
This menu is designed for students who are primarily learning about the definitions at the top of the screen. Skills are checked off automatically as the student changes the Primary Shape in the workspace to meet various requirements. The Skills checklist can be cleared by tapping the clear button at the top. Each skills list is ordered from most basic to advanced. This provides some extra challenge problems for students who finish ahead of the rest of their peers.
Transform menu
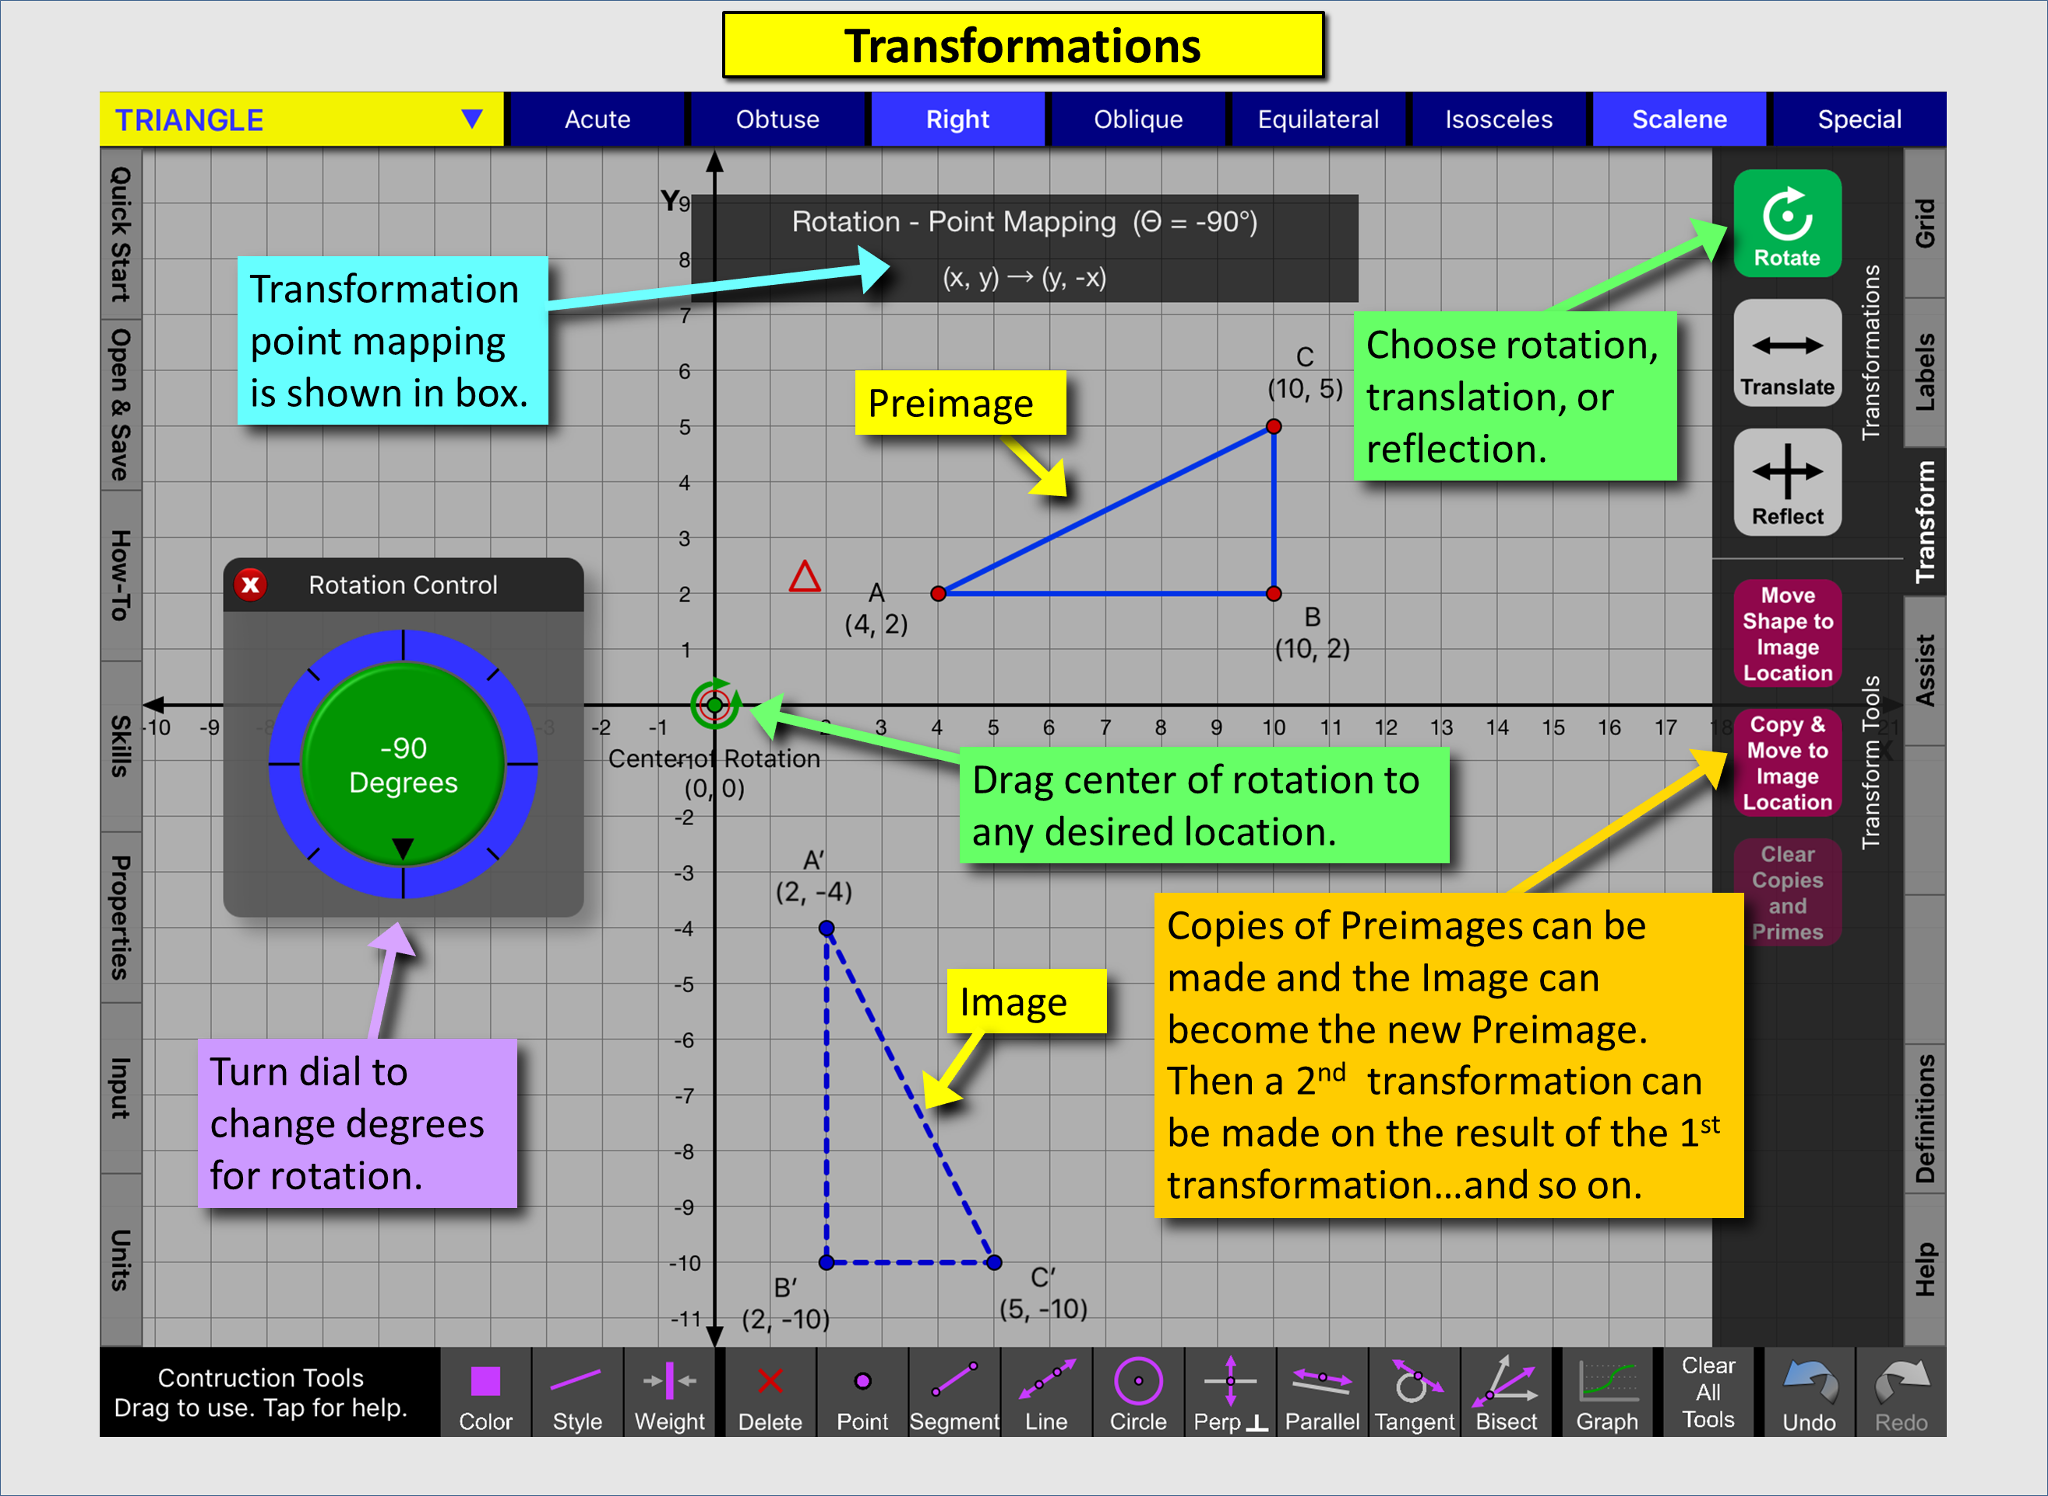
The Transformation menu allows you to perform rotations, translations, and reflections on the following Primary Shapes: Point, Line, Ray, Segment, Triangle, and Quadrilateral. You can only choose one type of transformation at a time.
Preimage: The original figure before a transformation is shown with red points and solid blue lines. Point names are A, B, C etc.
Image: The resulting figure after a transformation is shown with blue points and dashed blue lines. Point names are A’, B’, C’ etc.
Transform menu: Rotate
Tap the Rotate button to make it green and turn rotation on. Drag and drop the green “Center of Rotation” to the desired place. Use the Rotation Control to achieve the desired rotation. The Rotation Control box can be moved to any location on the screen by touching the top bar of the box and dragging it. The Point Mapping for the rotation will appear in a box at the top of the screen.
Transform menu: Translate
Tap the Translate button to make it green and turn translation on. The direction and distance of translation can be controlled in two different ways. It can be done via the sliders in the Translation Control box. It can also be done by dragging and dropping the terminal point (pointed end) of the green Translation Vector. The Translation Vector can be moved to any location on the screen by dragging its initial point. The Translation Control box can be moved to any location on the screen by touching the top bar of the box and dragging it. The Point Mapping for the translation will appear in a box at the top of the screen. NOTE: If Grid Snap is turned “On” via the Grid menu, then the resulting Translations in the x and y directions will also snap to whole numbers.
Transform menu: Reflect
Tap the Reflect button to make it green and turn reflection on. The reflection is controlled by moving the green “Line of Reflection” to the desired location by dragging and dropping the two green points that define the line. The point mapping for the reflection will only be displayed in the top box when the Line of Reflection is horizontal, vertical, or is the line y=x or y=-x. NOTE: If Grid Snap is turned “On” via the Grid menu, then the green points that define the line of reflection will also snap to grid points.
Transform menu: Move Shape to Image Location
Preimage: The original figure before a transformation is shown with red points and solid blue lines. Point names are A, B, C etc.
Image: The resulting figure after a transformation is shown with blue points and dashed blue lines. Point names are A’, B’, C’ etc.
The “Move Shape to Image Location” button will move the Primary Shape (pre-image) to the location of the image. This is handy of you want to perform another type of transformation on the resulting figure after the first transformation is complete. This is also handy if you simply just want to move your Primary shape to another location via a transformation instead of dragging individual points. Using this menu option, the Primary Shape will always have point names A, B, C etc.
Transform menu: Copy and Move to Image Location
When doing successive transformations on the Primary Shape, you may want to keep copies of the original preimage and intermediate images so you have a record of where you started and the images that follow it. When using this menu option, the Primary Shape (pre-image) is moved to the image location. A light blue copy of the original pre-image will be left behind with points A, B, C etc. The new Primary Shape (pre-image)will now be labeled with points A’, B’, C’ etc. and the new image will now be labeled with points A”, B”, C” etc. Now you can perform another transformation of a different type. The number of primes will continue to increase as more copies are made.
Transform menu: Clear Copies and Primes
If you used the “Copy and Move to Image Location” button, you will have light blue copies on the screen and the Primary Shape will have one or more primes on the point names. This button clears all copies and primes and leaves the Primary Shape in its last location. NOTE: “Clear All Tools” on the bottom of the screen also clears copies and primes.
Assist menu
Assist menu: Enable Teacher
Teacher: Press “Enable Teacher” button. A “Teacher” tab will appear on the right-hand side of your screen and it will automatically open. If this is your first time enabling teacher mode, tap on white box at top to enter the teacher name.
Student: Once any teacher enables teacher mode, a “Student” tab will appear on all iPads on the local wifi network that are running the Geometry Ace app. The student opens this tab, and if it is their first time logging in as a student, they need to enter their student name in the white box at the top. Then the student taps on the teacher name they want to be connected to.
Teacher: Now the teacher (which the student just selected) will see the students name appear on the list in the “Teacher” tab. The teacher can now tap on the name of the student that they want to view, and the student’s screen will appear in the teacher’s center workspace. The teacher will see live updates as the student works. The teacher will see everything in the workspace except a graph. The teacher can also take control and move things and live updates will appear on the students screen. When the teacher unselects the student, the workspace on the teacher’s iPad will return to its previous contents prior to interacting with the student.
Menus Seen in Teacher mode: Teachers and students will also see each other’s menus open and both can use the menus. Results from menu actions will be seen on each other’s screens.
The following menus are fully synched between teacher and student:
- Grid
- Labels
- Transform
- How-To
- Skills
- Properties
- Input
- Units
The following is a list of menus that intentionally do not appear on each other’s screens:
- Quick Start: Teacher or student can open a quick start locally and the resulting selection will be shown on both screens.
- Open and Save: Files are saved locally; however, a file that is opened will be shown on both screens
- Assist Menu: Teachers and students can reset the current workspace and the results are shown on both screens. Teachers and students cannotreset each other’s entire app or turn each other’s menu auto-close on/off.
- Graph Tool: Both teacher and student can make a graph, but the results are only shown locally.
- Teacher, Student, Definitions, and Help menus only appear locally.
- In addition, color scheme and background image are local to each user’s iPad.
Assist menu: Reset Current Workspace
Use this button to reset the workspace of the current Primary Shape to the factory default settings. This option is handy if you want to quickly restore a workspace that has gotten out-of-hand back to usable settings. This option can also be used to get rid of a bug in the programming that will not go away. Please email us this bug first (via the Contact Us & Attach Workspace button) so we can fix it for the next version!
Assist menu: Reset Entire App – Clear ALL Saved
Use this button to reset the all of the Primary Shape workspaces of the entire Geometry Ace app to the default factory settings. This option is very handy to set everything to practical settings when a new student is using the program after the previous student changed a lot of the options or left behind cluttered workspaces. WARNING: This will also clear all of the 8 Save Spots for each Primary Shape.
Assist menu: Menu Auto-Close On/Off
Turning this function on will automatically close the following menus after 15 seconds of no use:
Grid
Labels
Transform
Assist
Student
Units
Assist menu: Play Intro Tutorial
This will play the introduction slide tutorial that was shown the first time this program was started.
Assist menu: Contact Us
The Contact Us button creates an email addressed to Interactive Mindware L.L.C. Please contact us to let us know what you like and do not like about Geometry Ace. Please send us new feature and content requests. Please also send us reports of any bugs you find. We will try to fix bugs and release them in a new version ASAP.
Assist menu: Contact Us & Attach Workspace
This button attaches the current Primary Shape workspace configuration to an email addressed to Interactive Mindware L.L.C. Please use this option for bug reports so we can get detailed information about the state of the program when a bug occurs. We will try to fix bugs and release them in a new version ASAP. Please also use this option if you would just like to easily illustrate something via the current workspace.
Definitions menu
This menu contains an alphabetical listing of definitions for most of the mathematical vocabulary words used in Geometry Ace.
Help menu
This is where you are now! Please contact us and let us know if you think additional explanations would be helpful for any topics.
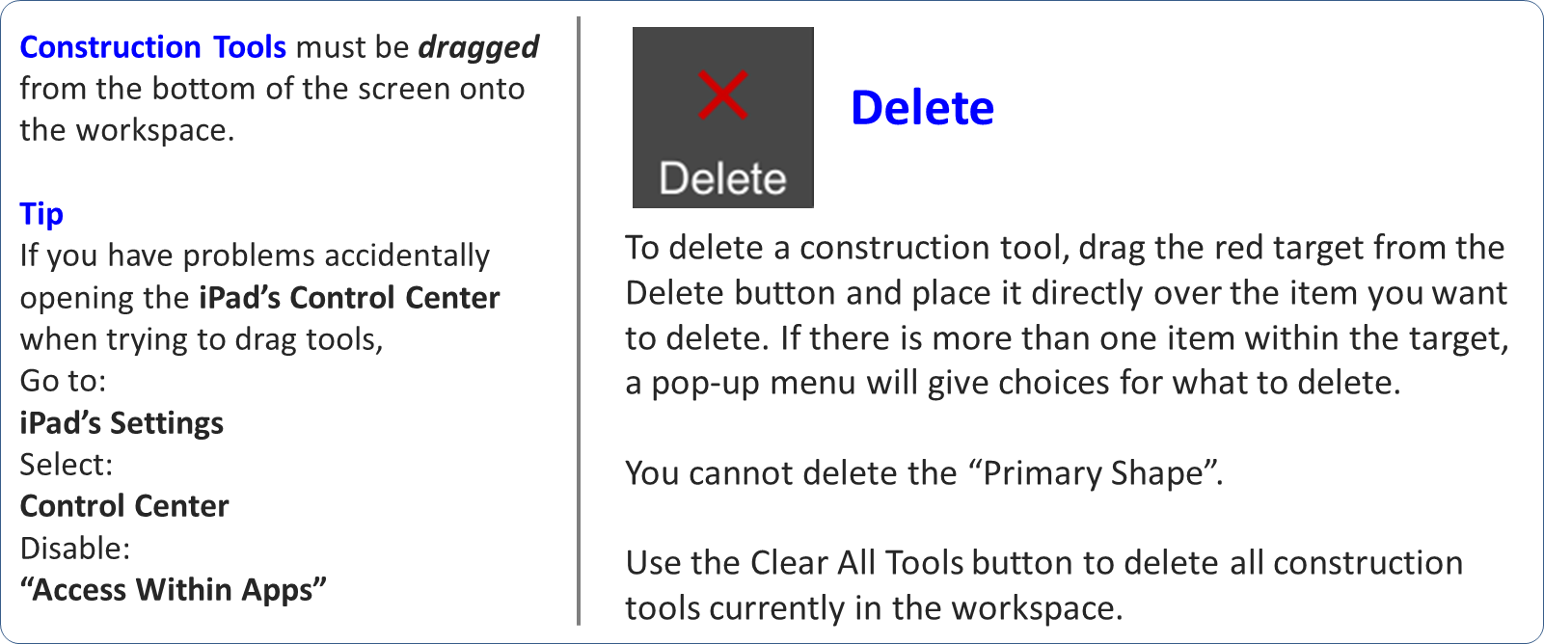
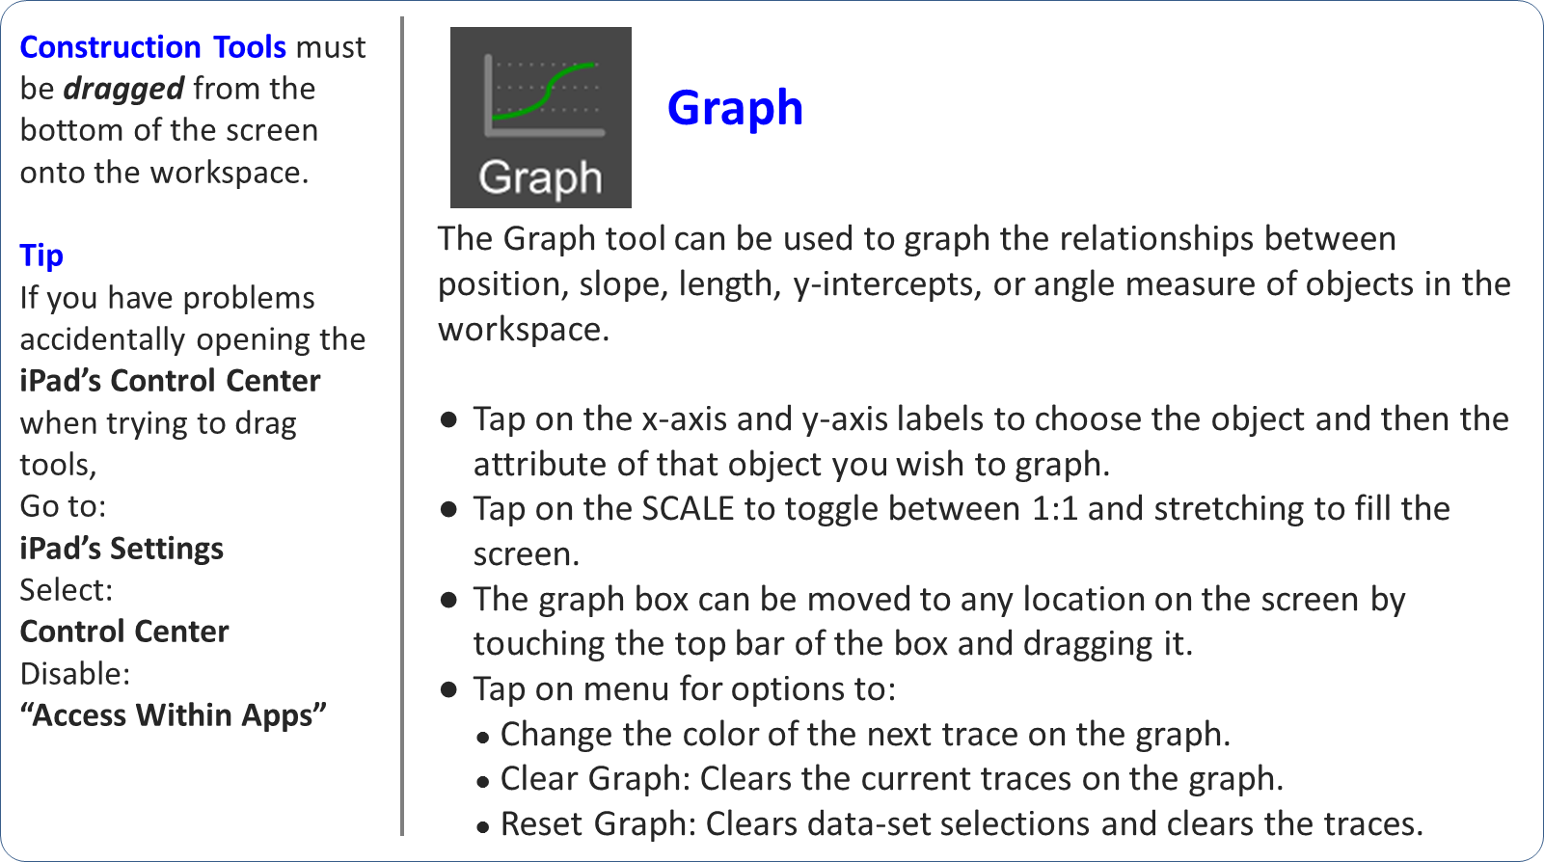
Construction Tools
These Construction Tools work differently than the menus/tabs on the other edges of the screen. These are not menus. To use a construction tool, you must DRAG a tool from the bottom edge onto the workspace.
NOTE: If you have problems accidentally opening the iPad’s Control Center when you are trying to drag a tool onto the workspace, you can go to the iPad’s “Settings” icon, select “Control Center” and then turn off “Access Within Apps”.
The tools can be dragged again to a different location after they are dropped onto the workspace. These Construction Tools can be used in the workspace for any of the Primary Shapes. If you want to start a construction on a blank screen, just use the point workspace. The labels for construction tools can be modified the same as for Primary Shapes.
TAP the tool buttons to get a help page for that tool. The following buttons have help pages:
- Delete
- Point
- Segment
- Line
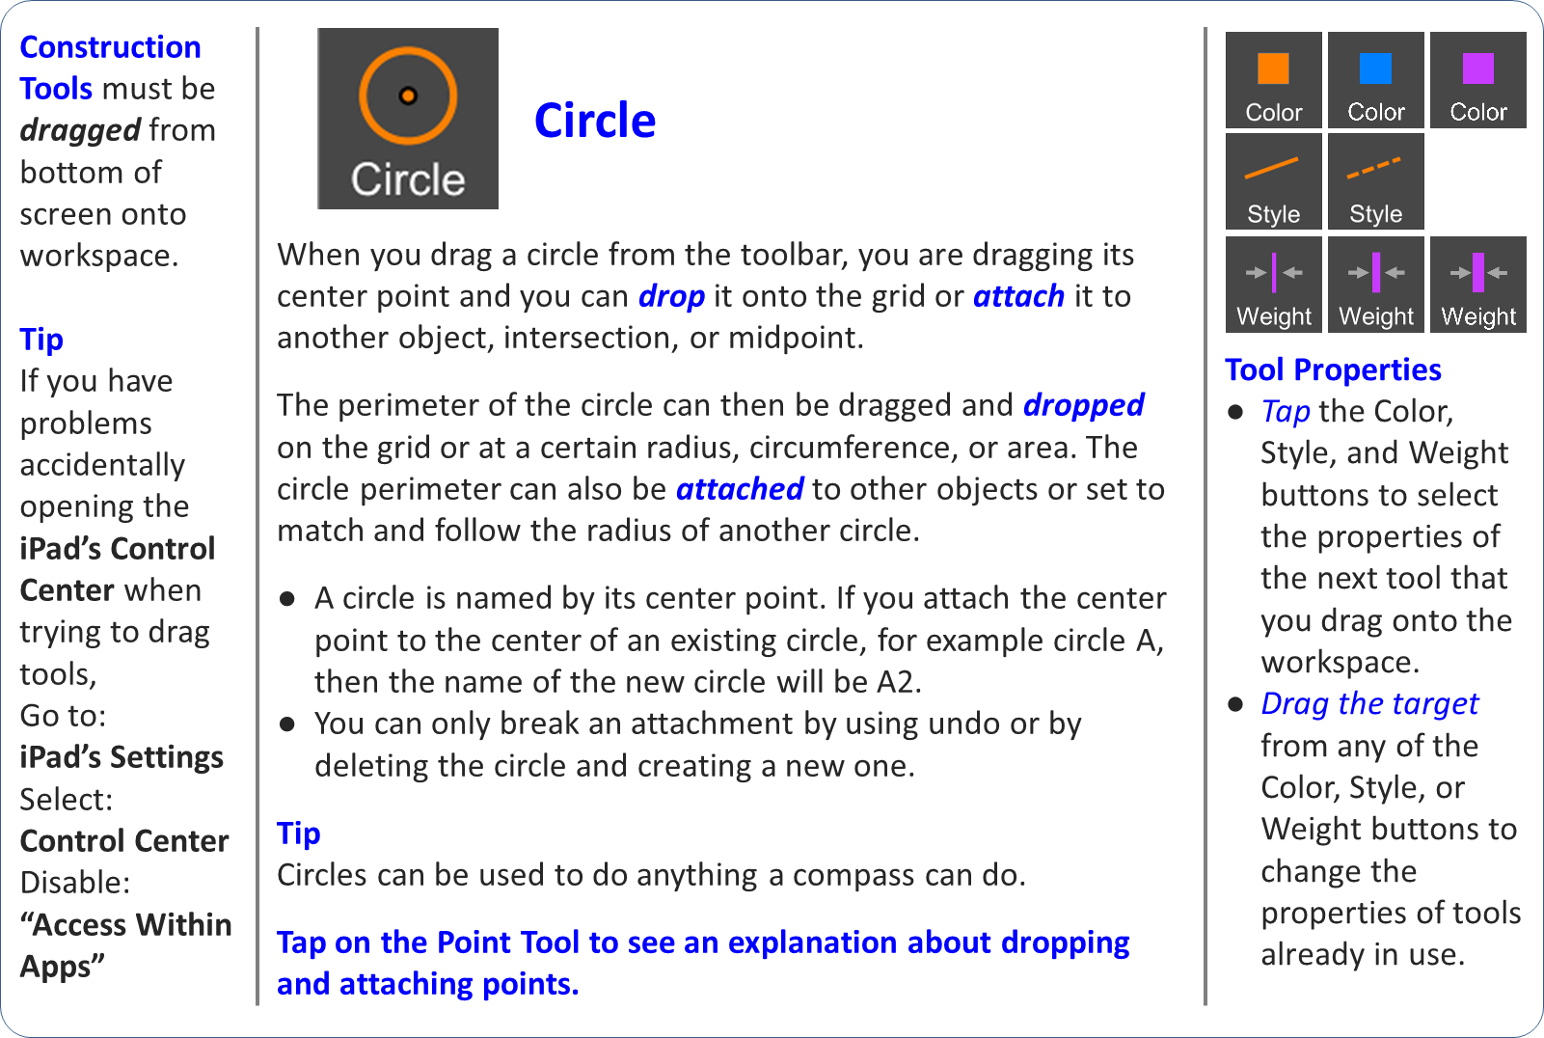
- Circle
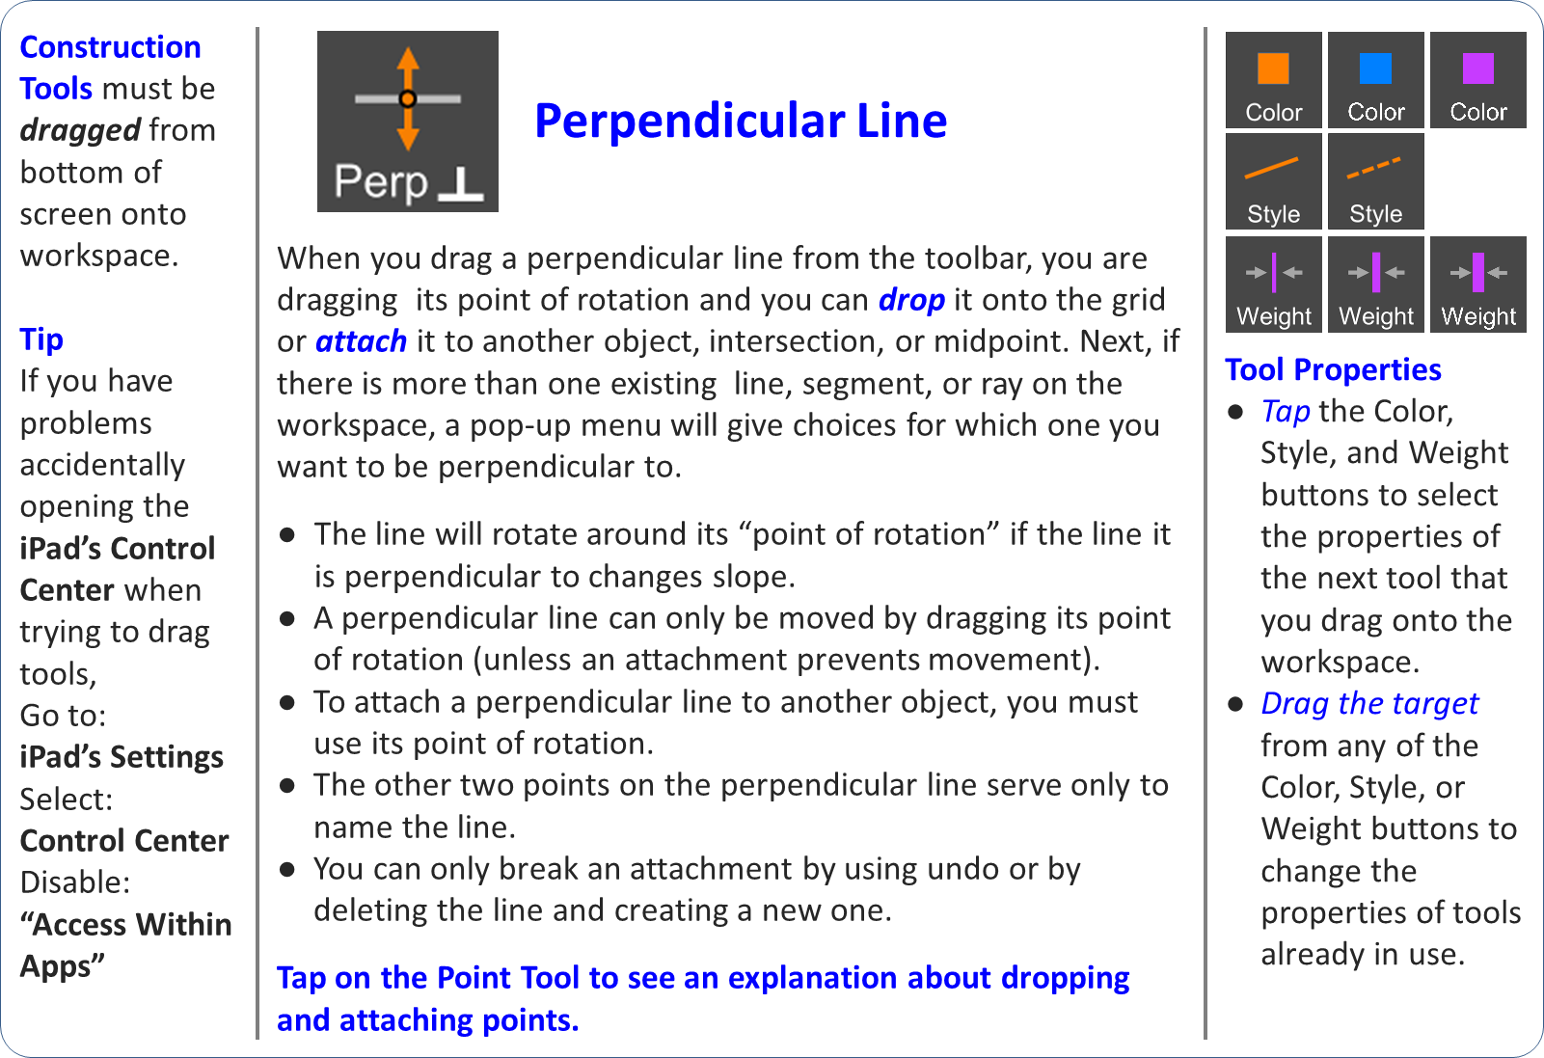
- Perpendicular
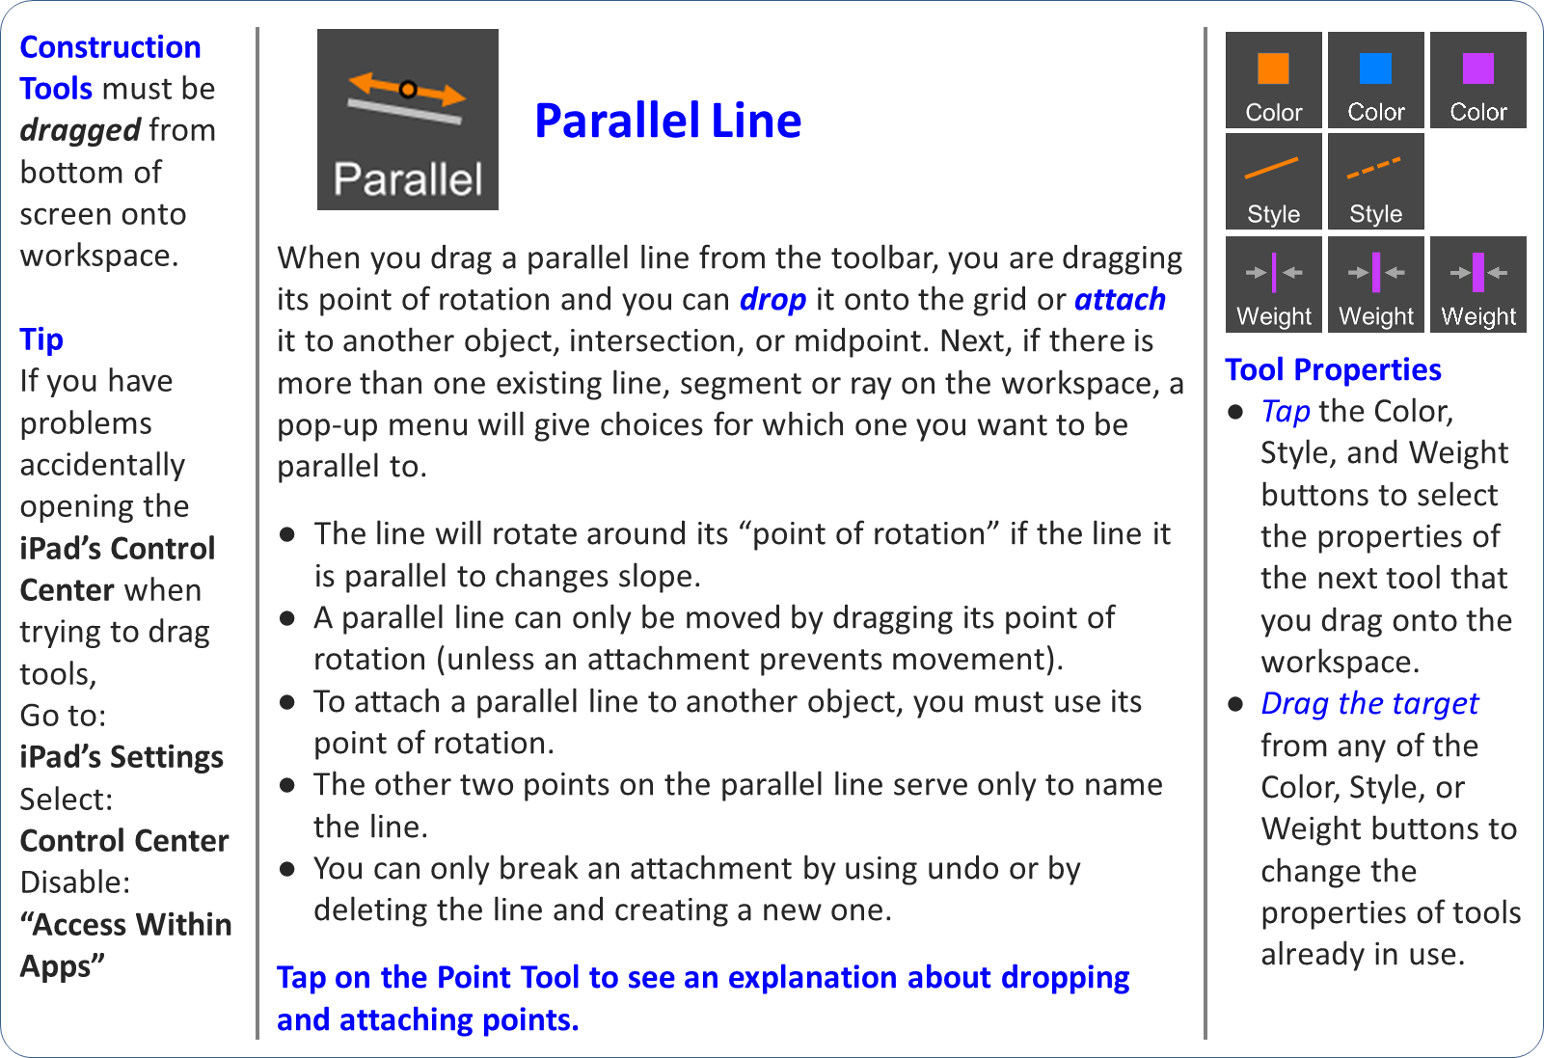
- Parallel
- Tangent
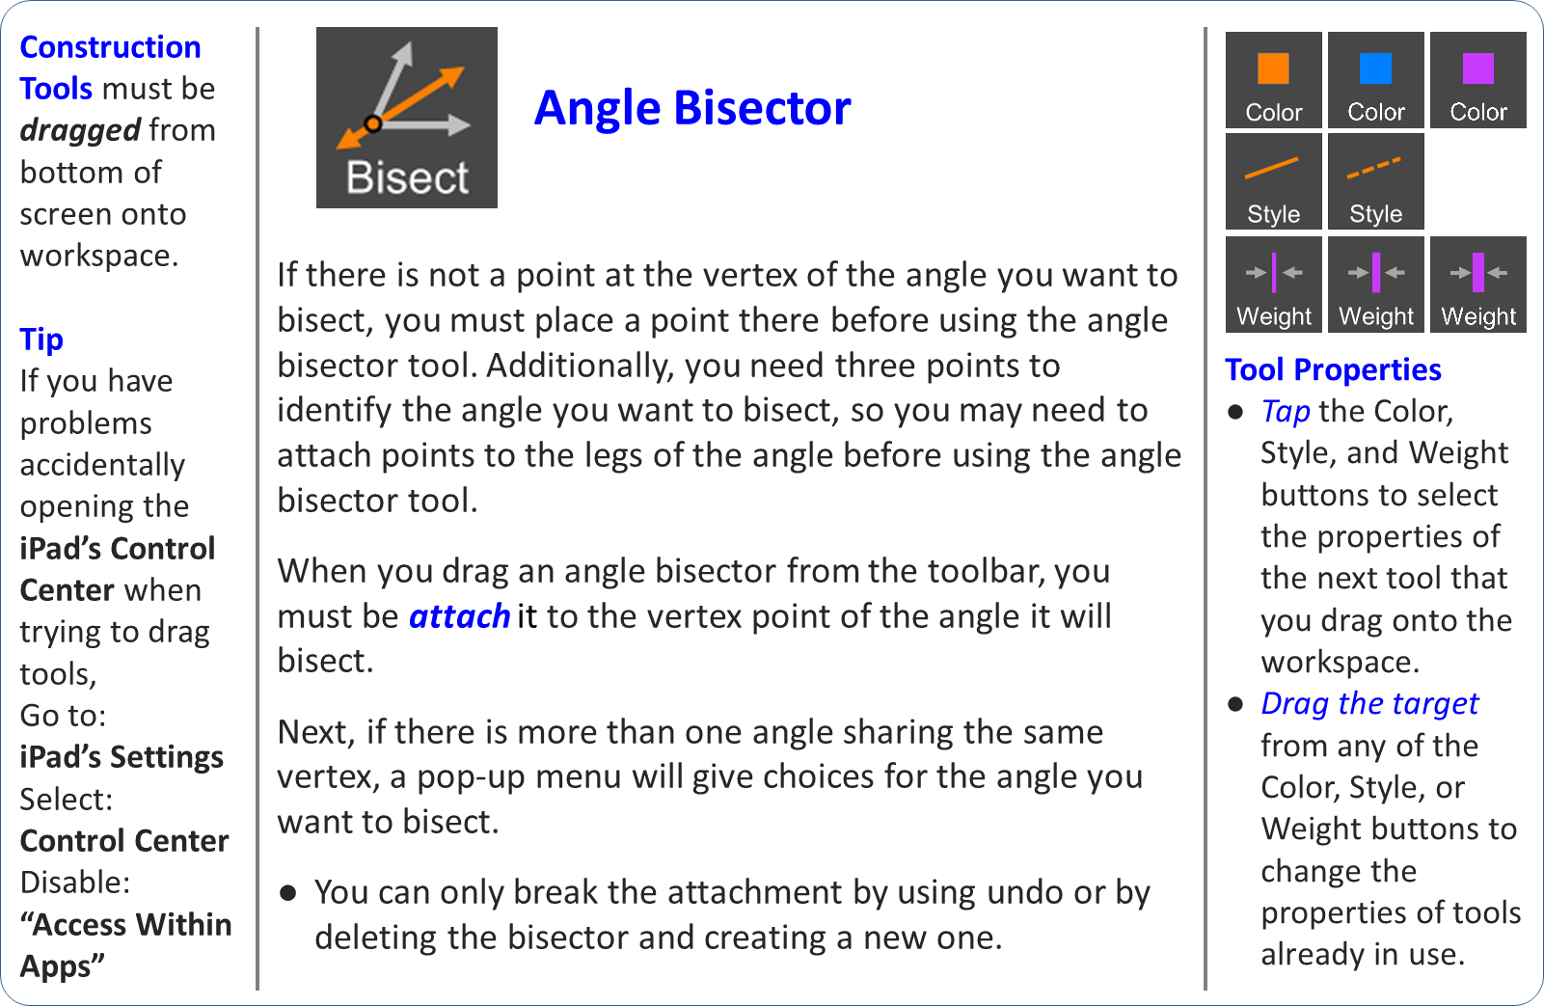
- Bisect
- Graph
Information about Color/Style/Weight is on all help pages above. Tapping these buttons will always toggle through the choices.
Tip:
You can use Segments to measure anything by attaching its endpoints to key locations.
Circles can be used in place of a compass.
Construction Tools: Dropping and Attaching Points
When you drag a point onto the workspace, you can drop it onto the grid or attach it to another object/intersection/midpoint. This works the same for the defining points of lines or segments. Construction tool points can be attached to primary shapes or other construction tools. Note: To make an attachment between a construction tool and a primary shape, you must drag and attach the construction tool point to the primary shape. It does not work the other way around.
Drop
Dropped points can be moved again.
- If you drag a point to a location with no objects nearby, the point drops as you lift your finger.
- Points snap to grid intersections if Grid Snap is turned on via the Grid menu.
Attach
You can only break an attachment by using undo or by deleting the point and creating a new one.
- If you drag a point near objects, intersections, or midpoints, a pop-up menu gives options for attachment or to drop it. Tapping elsewhere on the screen closes the pop-up menu and results in a drop onto the grid.
- If you attach to another point, the point that you are dragging will merge with and assume the name of the point you are attaching to.
- If you attach a point to a line, line segment, or circle perimeter, you will be able to slide the point along the line/segment/perimeter.
- You can attach a point to the intersection of lines, rays, segments, and circles perimeters.
Construction Tools: Delete and Clear All Tools
The construction tools can be deleted one at a time by dragging the red X from the bottom of the screen over the object that you want to delete. If you want to clear an entire construction all at once, use the Clear All Tools button.
Note: Primary Shapes cannot be deleted (dark blue lines and red points).
Graph
The Graph tool can be used to graph the relationships between position, slope, length, y-intercepts, or angle measure of objects in the workspace. Tap on the x-axis and y-axis labels to choose the object and then the attribute of that object you wish to graph. Tap on the SCALE to toggle between 1:1 and stretching to fill the screen.
Tap on menu for options to:
- Change the color of the next trace on the graph.
- Clear Graph: Clears the current traces on the graph.
- Reset Graph: Clears data selections and clears the traces.
The Graph box can be moved to any location of the screen by touching the top bar of the box and dragging it.